Flattr Android SDK
Android developer? Take advantage of Flattr by adding a Flattr button to your application. There are three ways to use the SDK:
- Display a Flattr button with the
FlattrButtoncomponent provided by the SDK. It extends theViewclass and can be used just like any classic component. - Show your thing to your users with
FlattrSDK.displayThing(). This call invokes the Flattr app developed by Flattr4Android. If the app is not installed, the user can either download it or go to Flattr web site. - Invoke the Flattr app yourself by calling
FlattrSDK.getDisplayThingIntent().
Install the SDK
Whatever the way you are going to use the SDK, the installation procedure is common.
The steps above suppose you have a MyApp Android project, stored in a directory called
MyApp/:
- Download the SDK
- Unzip the archive
- Create a
MyApp/libdirectory - Copy the JARs located in
flattr-android-sdk-0.0.1.1/libinMyApp/lib - Copy the pictures located in
flattr-android-sdk-0.0.1.1/drawableinMyApp/res/drawable - Submit a Flattr thing for your application if not done already
- Get a token, a token secret and your thing Id
Add a Flattr Button
How it works
Adding a Flattr button to your app is probably the prefered way to use the SDK. When your users click the button, your app's thing is presented through the Flattr4Android app. If they do not have the Flattr4Android app, they are invited to install it or to see your thing on the Flattr web site.
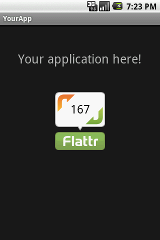
A classic Flattr button presents two information:
- Click count: how much time the thing was clicked? This information is public and can be obtained via the REST API.
- Thing status: did the logged user already flattr this thing? This information is private to the user. It can be retrieved with the help of the REST API, for the authenticated user only.
Adding the button
As the Flattr button is just a View, manipulating it is straightforward:
- Install the SDK
- Grant full Internet access to your application and allow it to interact with the
Flattr application by adding two permissions in its
AndroidManifest.xml:<?xml version="1.0" encoding="utf-8"?> <manifest xmlns:android="http://schemas.android.com/apk/res/android" package="com.mycomp.myapp" android:versionCode="1" android:versionName="1.0"> <application android:icon="@drawable/icon" android:label="@string/app_name"> (...) </application> <uses-permission android:name="android.permission.INTERNET"/> <uses-permission android:name="com.flattr4android.permission.READ_THING"/> </manifest> - In your layout XML definition, declare the SDK namespace by adding the
following definition in the top level layout declaration:
xmlns:flattr_sdk="http://schemas.flattr4android.com/sdk". For example:<LinearLayout xmlns:android="http://schemas.android.com/apk/res/android" xmlns:flattr_sdk="http://schemas.flattr4android.com/sdk" android:orientation="vertical" android:layout_width="fill_parent" android:layout_height="fill_parent"> - In your layout XML definition, declare a button:
<com.flattr4android.sdk.FlattrButton android:layout_width="wrap_content" android:layout_height="wrap_content" flattr_sdk:token="TODO" flattr_sdk:token_secret="TODO" flattr_sdk:thing_id="TODO" flattr_sdk:button_style="vertical"/> - Fill the
token,token_secretandthing_idwith the credentials and thing Id you got during the SDK installation. - Choose your button look by setting the
button_styleattribute. Allowed values areverticalandhorizontal.
You can also build a FlattrButton programmatically:
FlattrButton button = new FlattrButton(this);
// Replace these example tokens by your tokens
button.setFlattrCredentials(
    "a0b763bd6595b590a59ac90d1f9cae90",
    "b5ac9ef21269f1f27d662e5ff9509833");
// Replace this example id by your app thing id
button.setThingId("7e4c65bfab8ee31e7d79f4d3b7bcfe19");
button.setButtonStyle(FlattrButton.BUTTON_STYLE_VERTICAL);
LinearLayout myLayout = (LinearLayout) findViewById(R.id.main);
myLayout.addView(button);
That's all! Your button is up and ready. Your users can now flattr your app.
Present your app's thing to your users
If you do not want to use the Flattr button, you can still use the SDK to display a thing:
- Install the SDK
- When you want to show your thing to your user, call
FlattrSDK.displayThing:// Replace this example id by your app thing id FlattrSDK.displayThing(this, "7e4c65bfab8ee31e7d79f4d3b7bcfe19");
The behavior of this method is as follow:
- If the Flattr4Android application is installed, it is invoked. Your user is presented a clear page where he can flattred your thing immediately.
- Else, a dialog is displayed. It offers two possibilities:
- Download and install the Flattr4Android application
- Go to your thing's page of the Flattr web site
Get the Flattr4Android intent
You can invoke the Flattr4Android app yourself by getting the intent:
// Replace this example id by your app thing id
Intent i = FlattrSDK.getDisplayThingIntent("7e4c65bfab8ee31e7d79f4d3b7bcfe19");
startActivity(i);